The Ultimate DMflow Guide: Unleashing Triggers for Next-Level Form Automation
Creation at: 2024-12-25 | Last modified at: 2025-03-26 | 14 min read
The Ultimate DMflow Guide: Unleashing Triggers for Next-Level Form Automation!
Hey DMflow comrades! We’ve journeyed through the jungles of dashboard configuration and explored the mysteries of the Knowledge Base. Now, are you ready to face the final boss? This ultimate guide will take you deep into one of DMflow’s most powerful weapons – the “Trigger” – and show you how it instantly makes your forms smarter, automating tasks big and small!
- Haven’t seen it yet? Recap DMflow Form Q&A System Guide - Part 1 here
- And the Mid-Game! DMflow Form Q&A System Guide - Part 2
Add a Trigger, Injecting Intelligence into Your Forms
Imagine triggers as little elves you’ve hired. They usually do nothing, but as soon as specific conditions are met (like someone filling out a form or clicking a button), they automatically jump into action, performing tasks according to your pre-defined instructions.
When adding a trigger, there are two main approaches:
- Bind to Form: This is the most common use case! When data within a form changes (like being added, modified, or deleted), you want your elf to automatically do something – perhaps write the updated data back to the database or notify relevant personnel. In this case, choose “Bind to Form.” The trigger will know which specific data record you’re operating on.
- Do Not Bind to Form: Some tasks aren’t directly related to specific form data but are more like standalone events. For example, you might want to automatically generate a report every morning at 9 AM or send an alert when an external system encounters an issue. For these scenarios, choose “Do Not Bind to Form.” These triggers are often used in conjunction with the “Scheduling” or “Webhook” features mentioned in the previous article.
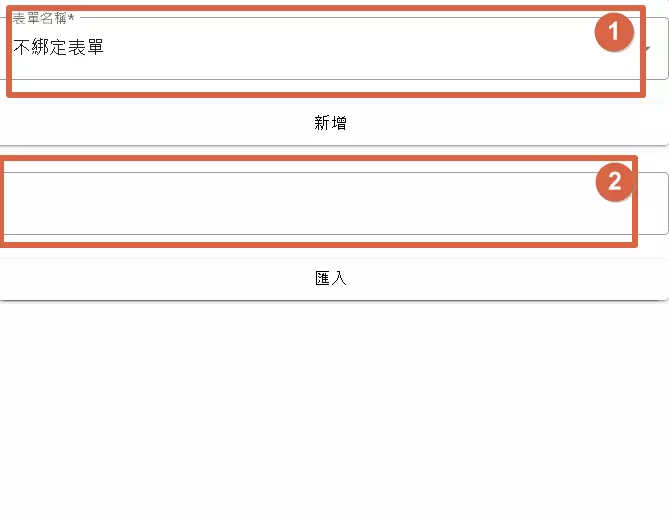
Craft Your Automation Blueprint: The Trigger Flow Editor
DMflow thoughtfully provides a visual “Trigger Flow” editor, allowing you to design automation processes by dragging, dropping, and connecting elements, much like playing with building blocks.
- Node Library (Left Side): This area is filled with “building blocks” for various functions, known as “nodes.” Each node represents a step or action in the flow. Your job is to pick the nodes you need from here.
- START: The beginning of every flow, mandatory!
- END: The end of the flow, telling the system it’s finished here.
- IF: A branching point in the flow, used for conditional logic.
- ASSIGN: Assigns values to variables or performs simple data manipulation.
- RESPONSE: Displays a message to the user, asks a question, and waits for a reply.
- ERROR: Handles potential errors that occur during the flow.
- STORE_QUERY: Similar to Response, but mainly saves the user’s “raw input.”
- Row Exist: Checks if a specific data record exists.
- Me: Fetches information about the current user.
- (Other more advanced nodes will be introduced later!)
- Canvas Area (Middle): This is your “workbench.” Drag the selected nodes from the left onto this canvas, then connect them with lines to define how the flow should run.
Building a Flow in Three Easy Steps:
- Select Nodes: Choose the functional nodes you need from the left.
- Drag Nodes: Drag the chosen nodes onto the middle canvas.
- Connect Nodes: Click the small circle on a node, drag a line out, and connect it to the small circle on the next node. This determines the flow’s direction!
Pretty intuitive, right? Even without coding experience, you can easily get started!
Fine-Tune Each Step: Basic Node Settings

Clicking on any node dragged onto the canvas allows for detailed configuration:
- Node ID: A unique identifier automatically assigned by the system. You usually don’t need to worry about this; it’s mainly for system use.
- Node Name: You can give the node a memorable name, like “Check Inventory Level” or “Send Order Confirmation Email.” This helps you understand the flow when revisiting it later.
- Node Parameters: This is key! Different nodes have different functions and require different parameters. For example, a “Response” node needs the question to ask the user; an “If” node needs the condition to evaluate. Refer to DMflow’s documentation for specific parameter details.
- Node Output: After a node executes, it produces results, which are displayed here. You can click the copy button next to an output to copy its “path,” making it easy to use this result in subsequent nodes.
Special Note: Some nodes are inherently “terminal points,” such as “Response,” “Error Response,” and “Store Query.” Because they need to pause and wait for user input, no other nodes can follow them. Other nodes will execute sequentially until they reach an End node.
Beginning and End: Start, End Nodes
These two nodes don’t have special settings but are crucial:
- Start: The starting point of every flow. Must have one, and only one.
- End: Marks the normal conclusion of the flow. Also required.
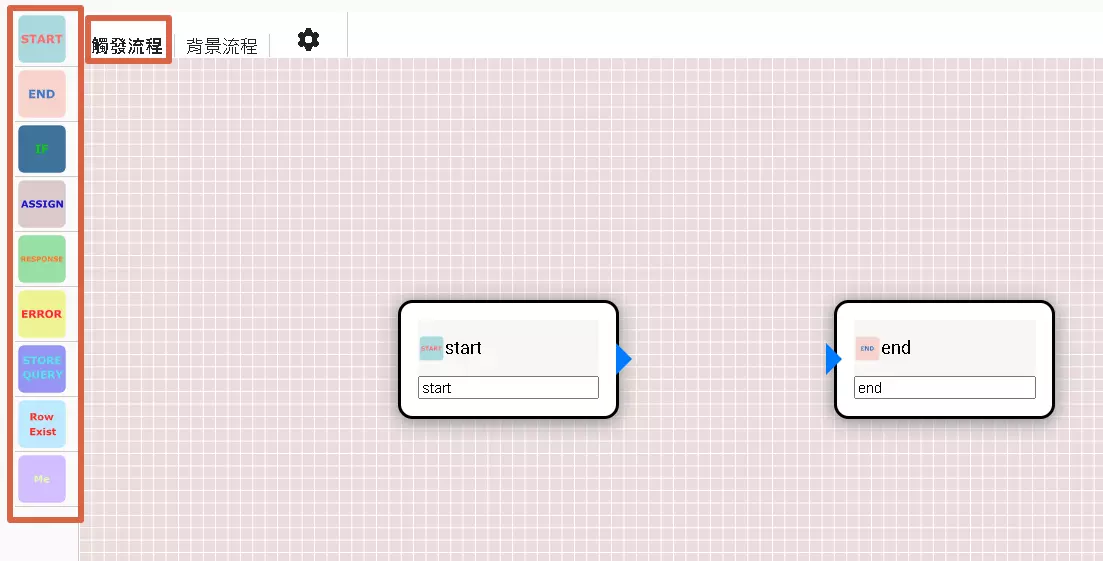
Branching the Flow: If Node
The If node acts like a crossroads in your flow. Based on the conditions you set, it decides whether to go left or right.
- Condition Type: You can compare:
- Boolean: Compares
trueorfalse. - Date & Time: Compares dates and times. Warning! The format is extremely strict: only
yyyy-MM-dd'T'HH:mm:ssZZZ(e.g.,2024-10-27T10:30:00+08:00) is accepted. Even slight deviations won’t work! - Number: Compares numerical values.
- String: Compares text content.
- Boolean: Compares
- Comparison Operators: Equals (
=or==), Not equals (!=or<>), Greater than (>), Less than (<), Greater than or equal to (>=), Less than or equal to (<=), and text contains (contains), etc. - Multiple Conditions: You can set multiple conditions and combine them using
AND(all conditions must be true) orOR(at least one condition must be true). However, there’s currently a limitation: within a single set of conditions, you must use either all ANDs or all ORs; mixing is not allowed.
After setting the conditions, the If node will have two output paths: one for when the condition is true, and another for when it’s false.
Handy Data Handler: Assign Node
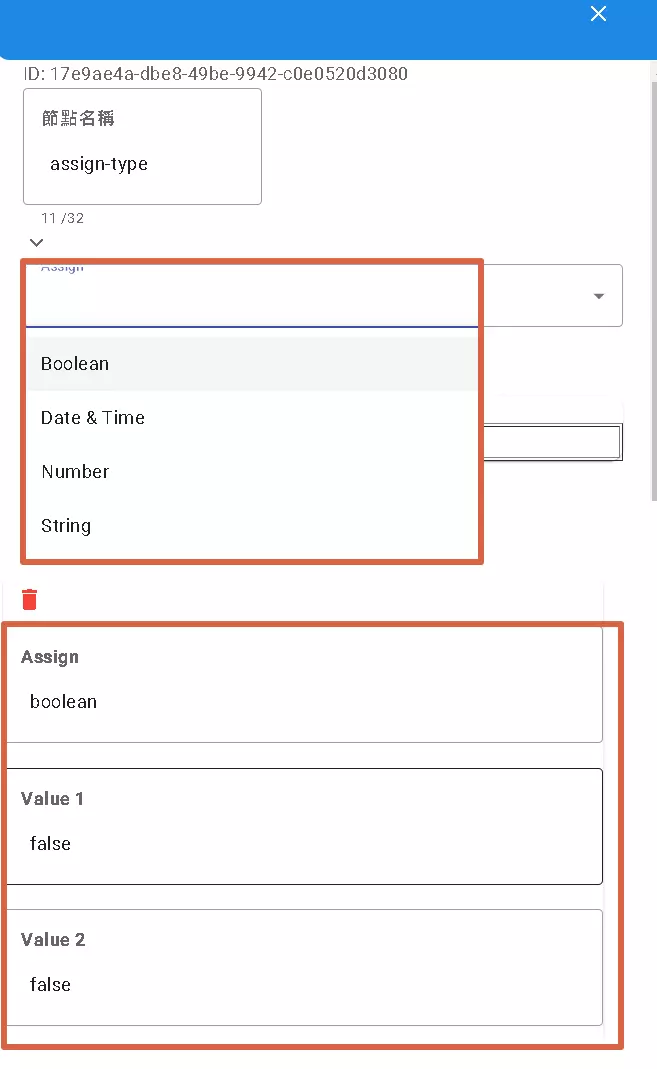
The Assign node’s function is straightforward: it assigns a specific “value” to one or more “variables.” Think of it as labeling variables or putting data into variable boxes.
- Assignment Target: First, choose the variable(s) you want to assign the value to.
- Value Type: Tell the system what kind of value you’re assigning (Boolean, Date & Time, Number, String).
- Value Source:
- Fixed Value: Directly enter things like
true,123, orHello. - Other Variable: Use the value of another variable.
- Expression: Use special syntax to combine or extract values, e.g.,
{{node['start'].key}}fetches the value of thekeyfield from thestartnode. - Previous Node’s Output: Directly use the result from the preceding node’s execution.
- Fixed Value: Directly enter things like
- Multiple Assignments: You can configure multiple assignments at once, putting different values into different variables.
The Assign node is frequently used in flows for temporarily storing data, converting formats, performing simple calculations, and more.
Interacting with Users: Two Modes of the Response Node
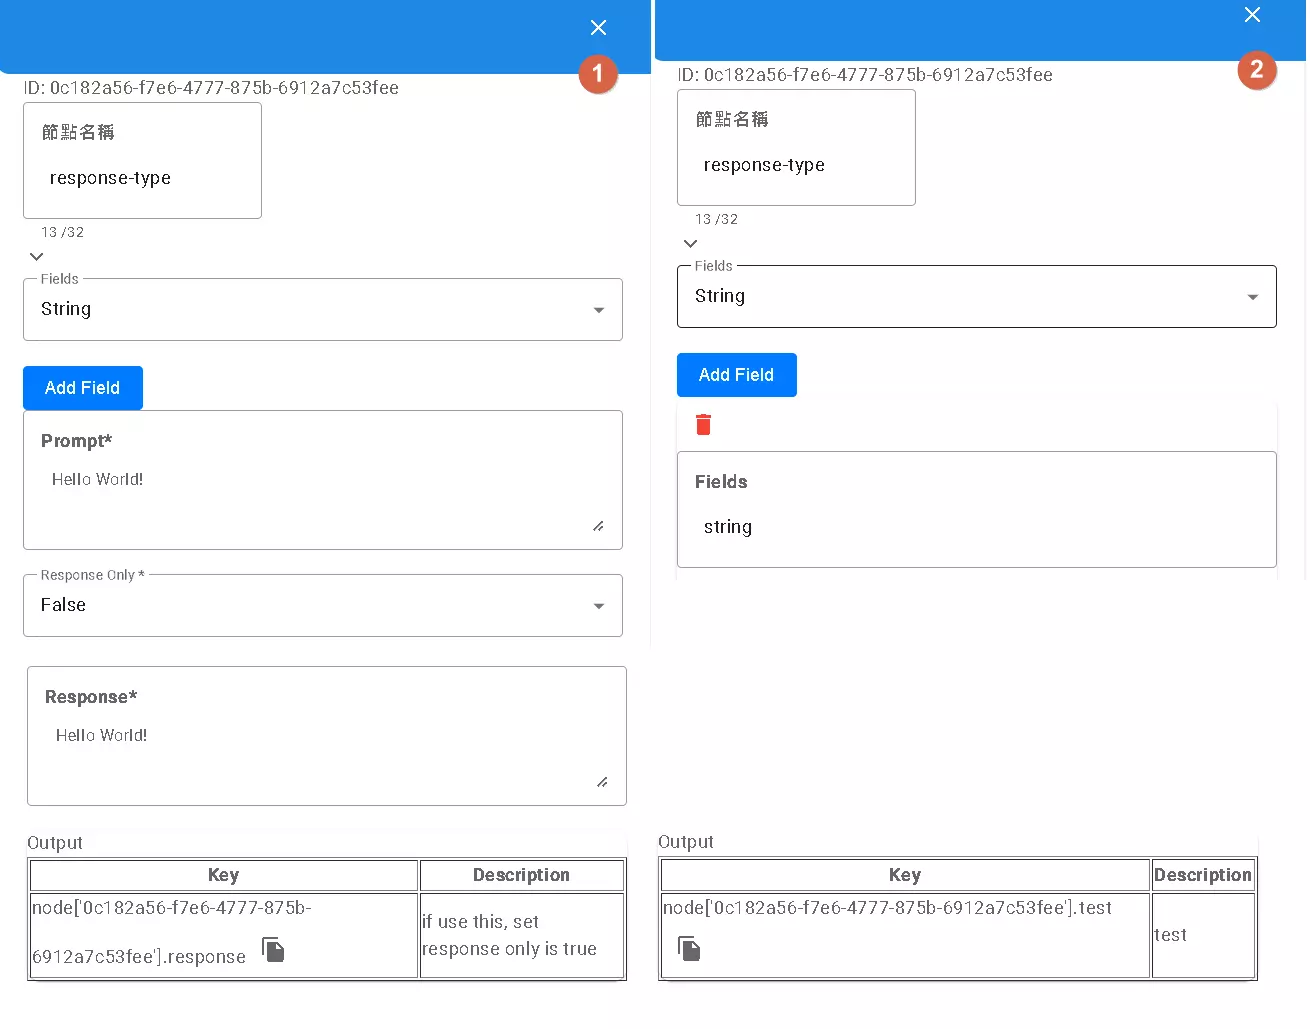
The Response node is your bridge for “conversing” with the user. It displays your configured message and waits for the user’s input. It has two main uses, depending on whether you configure Fields:
Mode 1: Without Fields (Simple Question & Answer)
- Use this if you just want to ask a simple question and get the user’s reply (e.g., “Please enter your name”).
- Set the
Response Onlyoption toTrue. - Subsequent nodes can then access the user’s entire input text using
node[...].response.
Mode 2: Using Fields (Structured Input)
- Use this if you want the user to provide multiple related pieces of information at once, and you want to process them separately (e.g., asking for name, phone, and email simultaneously).
- Click the “+” button next to
Fieldsto add one or more fields, giving each akey(e.g.,name,phone,email). - Set
Response OnlytoFalse. - Subsequent nodes can access the content entered in each corresponding field using
node[...].[your_key]. For example, usenode[...].namefor the name,node[...].phonefor the phone number.
Remember, the Response node is a terminal point; no other nodes can follow it.
What if the Flow Goes Wrong? Error Response Node
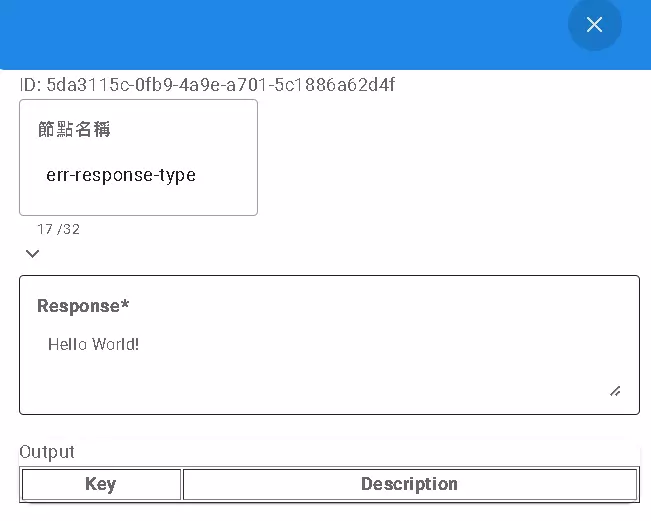
The error-response node serves as the flow’s “emergency exit.” If the flow encounters a problem mid-execution (e.g., invalid user input format, data not found) or triggers an unwanted condition, you can direct it to this node.
- How It’s Triggered: Often follows an
Ifnode. When theIfcondition evaluates to true (indicating an error), the flow proceeds toerror-response. - What It Does:
- Immediately stops the flow! No further steps are executed.
- Sends a pre-configured error message back to the user.
With this node, you can handle errors gracefully, provide clear feedback to the user, and prevent the flow from getting stuck or producing strange results. This is also a terminal node.
Preserving Raw Input: Store Query Node
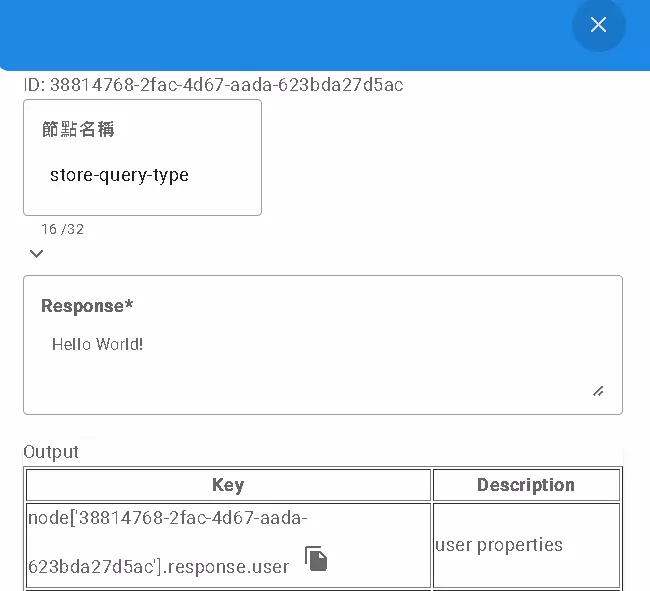
The store query node is similar to Response as it also receives user input. However, its primary purpose is to save the user’s “original query content” for later use.
- Main Functions:
- Captures the text entered by the user.
- Can optionally capture only a part of the input text.
- Stores the captured content in a variable or database field.
- When to Use: Use this node when you don’t need complex AI to understand user intent but simply want to extract keywords, numbers, or other specific information from their input.
- Example: User says, “I want to book 3 tickets to Taipei for tomorrow.” You might just want to extract and store “3,” “tomorrow,” and “Taipei” to directly query ticket availability later.
store queryis suitable for this.
This is also a terminal node that waits for user input.
Does the Data Even Exist? Row Exist Node
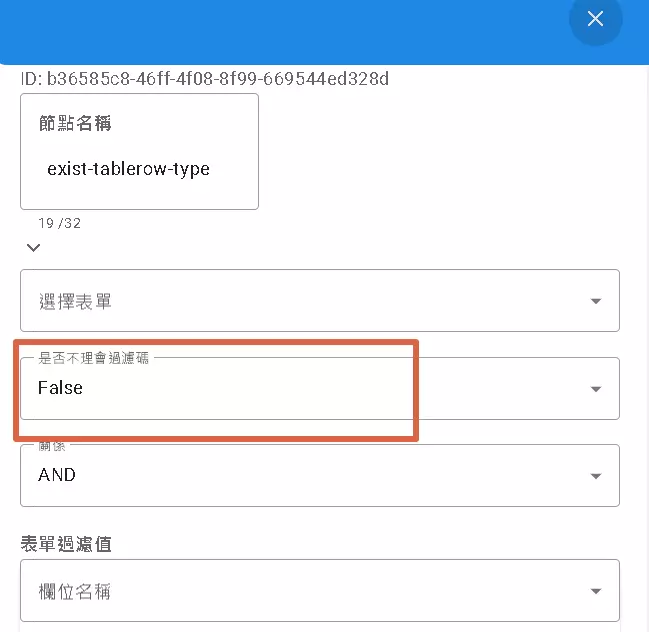
The row-exist node is straightforward: it checks if “data matching certain criteria actually exists.” For example, you might want to see if a customer’s order already exists in the database.
- Key Setting: “Ignore Filter Key” (Disregard Permission Code)
- False (Default): Checks only data the current operator has permission to see. E.g., Sales Rep A can only check if their own customers’ orders exist. This is the safer approach.
- True: Ignores permissions and searches all data in the system. E.g., a system admin checking data integrity across all users. Use this option with caution, as it might expose data you shouldn’t see!
- Result: After execution, this node typically offers two paths: one for “Exists” and one for “Does Not Exist.” You can decide subsequent actions based on the outcome.
Who Am I? Me Node
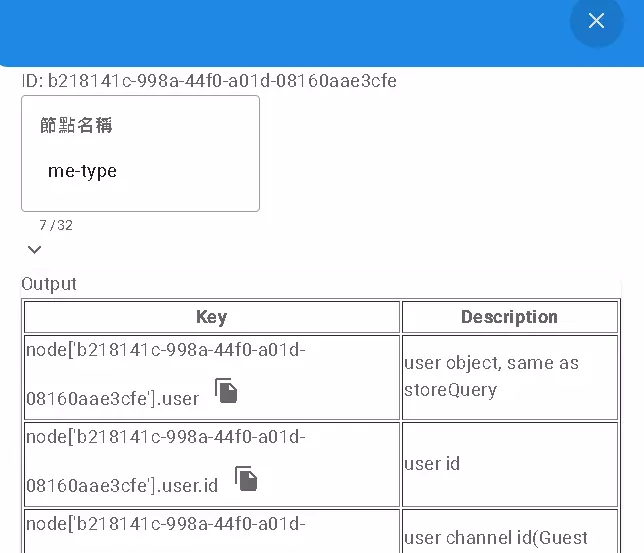
The me node is used to directly retrieve information about the “user currently running this flow.”
- Difference from
store query:store querywaits for user input;medoesn’t, it directly fetches current user data.store querypauses the flow;medoesn’t, it gets the data and continues.
- What You Get: Usually includes the complete User object, User ID (
userId), Channel ID (channelId- indicating their origin, e.g., visitor). - When to Use: Use
mewhen you simply need to know who is currently using the flow (e.g., for identity verification or logging the operator).
Handling Complex Tasks: Background Flows & Special Nodes
Some tasks take more time or require interaction with external systems. That’s when “Background Flows” and special nodes come into play.
Connecting to the Outside World: HTTP Node
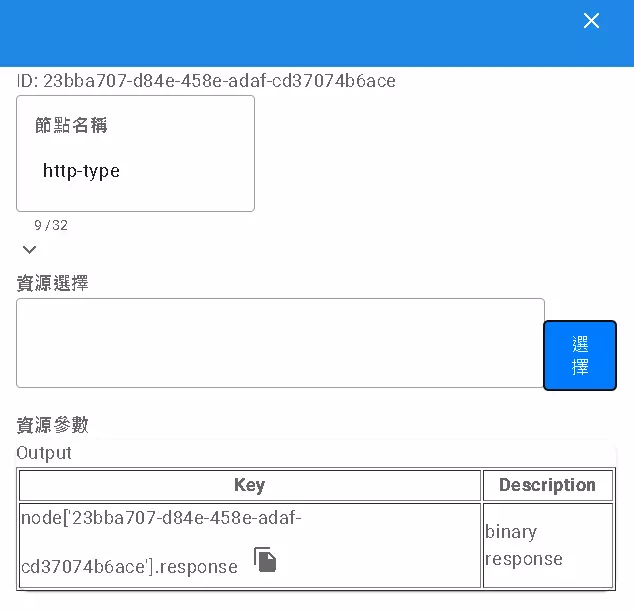
The http node allows your flow to communicate with the external world! You can use it to send HTTP requests (like a browser opening a webpage) to call external APIs, fetch web data, etc.
- Resource Node: For convenience, you can first store common API base settings (like URL, request method GET/POST, fixed Headers) in a “Resource.”
- To learn how to configure “Resources,” refer to the previous on-premise version tutorial.
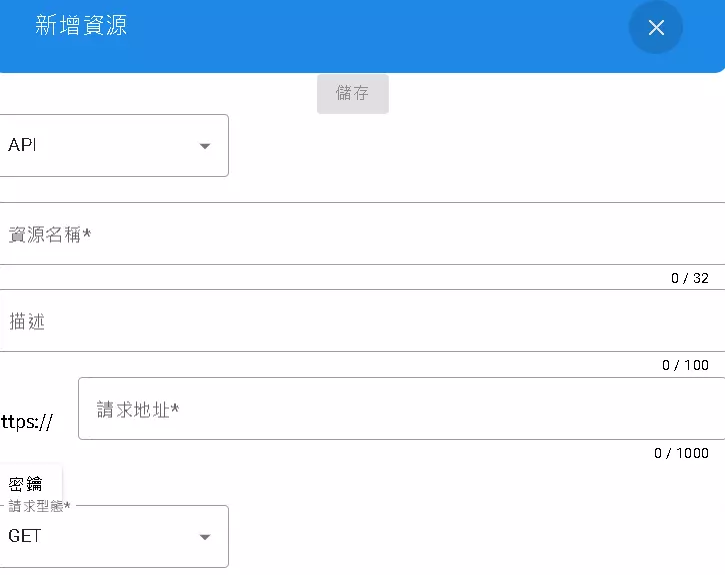
- To learn how to configure “Resources,” refer to the previous on-premise version tutorial.
- Resource Parameters: When actually sending a request, you can dynamically adjust parameters like query strings (
?key=value), the data to POST (Request Body), or request-specific Headers. - Getting the Response: After sending the request, the external server sends back data. This node receives the raw response content (usually binary data).
- Subsequent Processing: You might need subsequent nodes to process this response, such as parsing it from JSON format (JSONc parsing).
- Uses: Integrating with various third-party services (weather, maps, payments…), reading from or writing to external databases, etc.
Processing Lots of Data: Loops Node
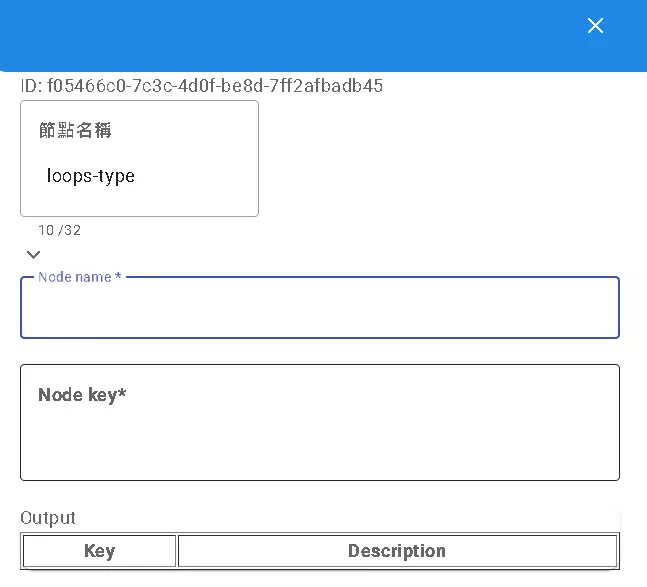
If your data is a long list or array (e.g., an API returns multiple product records), and you want to perform the same action on each item, the loops node is what you need!
- Settings:
Node name: Specify the node containing your list data in its output.Node key: Specify the key under which the list data resides within that node’s output.
- How It Works: It automatically finds the list you specified. For each item in the list, it executes the nodes connected after it once.
- Convenient Value Access: It simplifies accessing values within the loop. Instead of potentially complex paths (like
node['api_result'].products[0].name), you can use a simplerdata.propertyformat (likedata.name). In each iteration,datarepresents the current item being processed. - Example: Assume you have a list named
docswith three articles, each having atitleanddescription.{ "start": { "docs": [ { "title": "xx", "description": "x" }, { "title": "yy", "description": "y" }, { "title": "zz", "description": "z" } ] } }You set
Node nametostartandNode keytodocs. The nodes followingloopswill execute three times. In the first iteration,data.titlegives “xx”, the second gives “yy”, and the third gives “zz”. - Uses: Batch processing data, organizing API responses, generating multiple notifications, etc.
Interacting with Specific Apps: Application Nodes (Google Calendar Example)
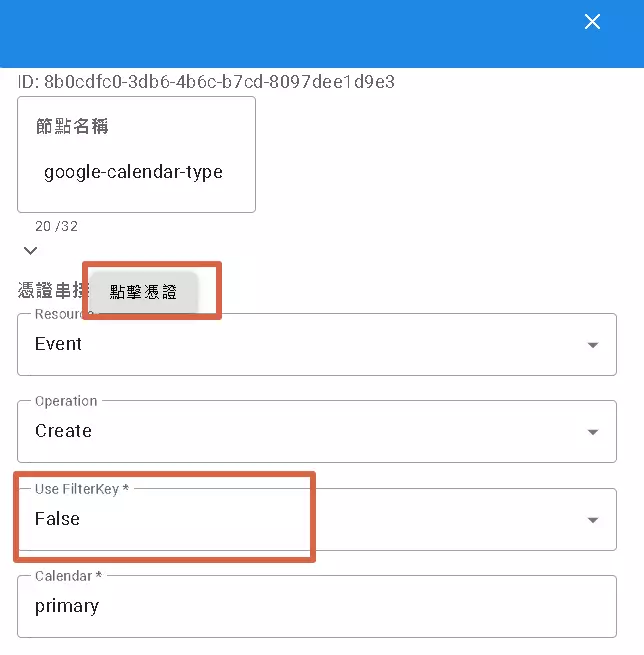
DMflow also has built-in nodes for direct interaction with specific applications (like Google Sheets, Google Calendar, Slack, etc.). Let’s use google-calendar as an example:
- Authorization: Typically requires setting up OAuth 2.0 authentication the first time, granting DMflow permission to operate your Google Calendar. Click the “Credentials” button to configure.
- Operation Type (Resource & Operation): Choose what you want to do with the calendar: Create Event, Read Event, Update, or Delete?
- Whose Credentials to Use? (Use FilterKey):
- Checked (True): Means use the Google account the current user has connected to DMflow to operate their calendar.
- Unchecked (False): Means use the credentials configured within the node’s settings (which might be a system-shared account or your own developer account).
- This option is crucial for scenarios where you need to act on behalf of the user with their personal services!
- Select Calendar: Choose which calendar to operate on (Primary? Or another one you created?).
- Event Details: Provide the title, description, time, attendees, etc., for the event being created or modified.
- Uses: Automatically creating meetings, syncing schedules, setting reminders… super convenient!
About Use FilterKey (User Third-Party Integration):
Many application nodes have the Use FilterKey option. Simply put, it determines: Should this operation use the user’s own linked account credentials, or the system default/node-configured credentials?
- Use User’s Account (Check Use FilterKey): Suitable when needing access to the user’s personal data or acting on their behalf (e.g., reading their Google Drive files, sending their Slack messages).
- Use System Account (Uncheck Use FilterKey): Suitable for system-level operations or actions unrelated to a specific user.
Note, however, that not every third-party service supports DMflow using individual user credentials this way.
Let’s Run It! Testing Your Trigger Flow
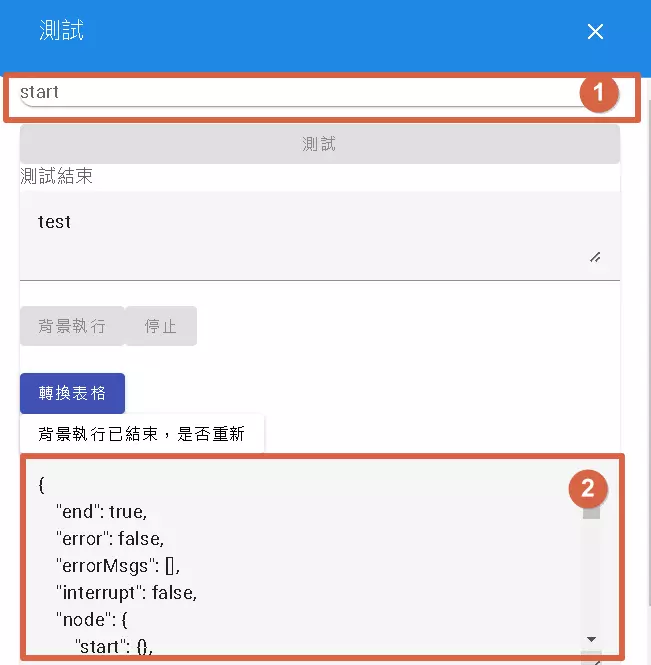
After designing your flow, you naturally want to test if it runs smoothly! DMflow provides a “Test” function:
- Simulate Input: After clicking the test button, you need to manually enter the potential input parameters that would trigger this flow. For example, if it’s a form-bound trigger, simulate a form data record; if triggered by a Webhook, simulate the content sent by the Webhook. The focus here is simulating the “input,” not executing the trigger’s own “output.”
- Full Monitoring: Once the flow starts running, the test window displays the execution status of each step, including:
- Which node is currently executing.
- The input received by each node.
- The output produced by each node after execution.
- Whether the flow completed normally.
- If an error occurred, which node failed and the error message.
- Stop and Observe: You can click the “Stop” button at any time to end the test run and carefully examine the data at each node. Note: It’s “Stop,” not “Pause”! Clicking Stop ends the test; you cannot pause and resume later.
Using the test function, you can step through your flow, check if it operates as expected, and quickly identify and fix issues.
Conclusion: The Infinite Possibilities of Automation
Congratulations! You’ve journeyed from basic form settings all the way to powerful triggers and automation flows. Together, we’ve deciphered the core functionalities of the DMflow form and Q&A system.
What you possess now isn’t just the ability to create forms, but the superpower to build intelligent, automated workflows! Triggers are like your magic wand; with creativity, you can automate repetitive tasks, making your forms not just data collectors, but active problem solvers and service connectors.
Of course, the world of DMflow is vast, with more details and techniques waiting to be explored. Hopefully, these three guides have provided you with a solid foundation, empowering you to wield this powerful tool with confidence.
Go forth! Start creating your own automation magic!

