DMflow Forms Mid-Game Tactics: Sorting, Grouping, Charts to Triggers – Unlock Advanced Plays
Creation at: 2024-12-24 | Last modified at: 2025-03-26 | 14 min read
DMflow Forms Mid-Game Tactics: Sorting, Grouping, Charts to Triggers – Unlock Advanced Plays!
Last time, we familiarized ourselves with the basic field settings in DMflow forms. Feeling like there’s more to explore? Don’t worry, this “Mid-Game” guide delves into more practical form functions, like filtering and sorting, playing with data perspectives, creating simple charts, and managing your knowledge base. The grand finale is the powerful “Trigger” feature! Ready? Let’s continue!
More Ways to Play with Forms? Exploring Advanced Features
Once you’ve nailed the field settings, let’s see how to make your form data more useful and visually appealing!
Quickly Find What You Need: Filtering
Is your data growing into an overwhelming sea? Fear not! The “Filtering” feature is your powerful magnet.
- Precise Search: Use keywords to search the content of specific fields.
- Handles Chinese Well!: A common issue with Chinese is word segmentation. Sometimes searching for Computer might not find laptap? DMflow thoughtfully enhances Chinese word segmentation search, allowing you to find data more accurately. Even if you just type Apple, it can smartly find items containing Apple juice or Red Apple.
- Multiple Conditions: Go beyond simple search. Set various filtering criteria (like date ranges, numerical comparisons) to pull out all matching data!
Line Up and Be Counted: Sorting
Want to see the highest scores? The most expensive products? The latest dates? The “Sorting” function handles it with a click!
- You can choose any field as the basis for sorting.
- Ascending (asc): Sorts from smallest to largest, oldest to newest.
- Descending (desc): Sorts from largest to smallest, newest to oldest.
Click the small arrow next to the column header, and your data will obediently line up!
Birds of a Feather Flock Together: Grouping & Calculation
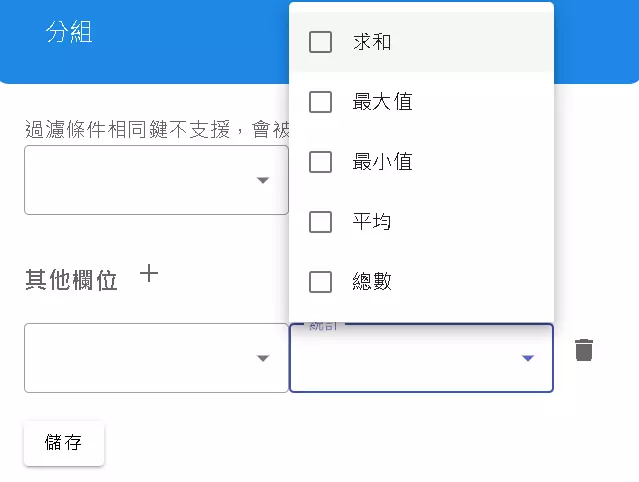
Sometimes, looking at individual records isn’t enough; we want to understand the overall picture for a specific “category.” That’s where “Grouping” comes in handy!
Imagine you’re organizing a pile of invoices:
- Choose a Basis for Grouping: You could group by “Store Name,” putting all invoices from the same store together.
- Calculate Within Groups (Aggregation): After grouping, you want to know the total amount spent at each store? That’s “Aggregation Calculation”! You can choose:
- Sum: Adds up numerical values within each group (e.g., calculate total spending per store).
- Max: Finds the maximum value within each group (e.g., find the highest single transaction amount per store).
- Min: Finds the minimum value within each group.
- Average: Calculates the average value within each group.
- Count: Counts the number of records in each group (e.g., count how many times you shopped at each store).
- Select Calculation Field: Of course, you need to tell the system which field you want to perform calculations on (usually a numeric field, like “Amount”).
Quick Reminder: If you use filtering and grouping simultaneously, and the filter causes some groups to disappear entirely, the calculation results might differ from what you expect. Keep that in mind.
Through grouping and aggregation, you can quickly grasp the overall data landscape, moving beyond just fragmented information.
A Different Angle on the World: View Switching
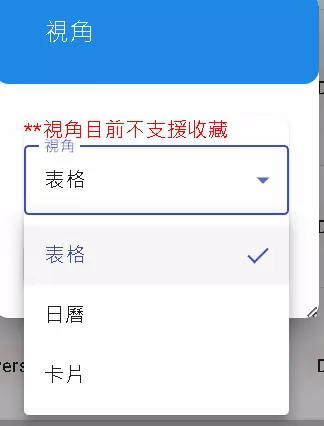
Presenting the same data differently can completely change the perception! DMflow offers several “Views” to switch between:
- Table: The classic grid layout, one row per record, one column per field. Best for detailed data viewing and comparison.
- Calendar: If your data involves dates and times (like meetings, appointments), the Calendar view makes it instantly clear! See what’s happening on which day.
- Card: Turns each record into a small card displaying key information. Visually more comfortable, suitable for quick browsing, and looks good on mobile too.
Heads up, though! DMflow currently does not have a Kanban board feature like Trello or Notion. Don’t get your hopes too high! These three views are what you get for a change of scenery.
Let the Numbers Speak: Chart Functionality
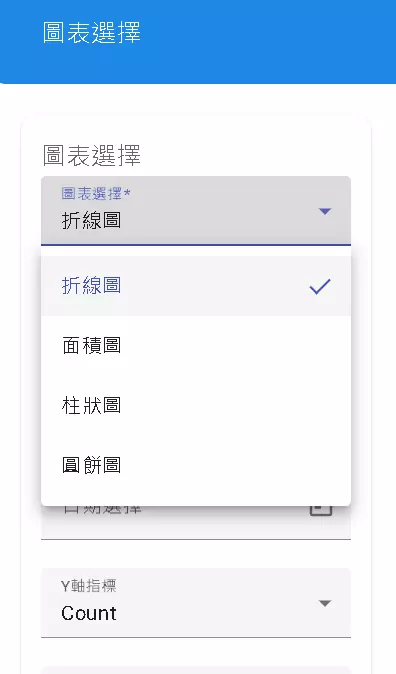
Drowning in numbers? Turn them into charts, and trends and proportions become instantly understandable!
DMflow allows you to create some simple charts:
- Line Chart: Best for seeing trends over time, like stock charts.
- Area Chart: Similar to a line chart, but the area under the line is filled with color, emphasizing cumulative amounts or proportions.
- Bar Chart: Uses the height of bars to compare values across different categories – very intuitive.
- Pie Chart: Shows the percentage contribution of each part to the whole, like market share. However, it becomes less effective if there are too many categories.
Y-axis Indicator: You need to tell the chart which value to display on the Y-axis (vertical axis). The default is Count, meaning it shows how many records fall into each category. You can change this to other numeric fields, like “Sales Amount.”
While the functionality is basic, it’s quite sufficient for quickly understanding your data overview!
Save Your Frequent Settings: Collection
Tired of re-applying filters, sorting, and chart styles every time? The “Collection” feature is your savior.
- Users: You can package your commonly used parameter settings (filter conditions, sort order, selected fields, chart settings, etc.) and save them with a name (e.g., “My Frequent Report”). Next time, just load it from your collections – super convenient!
- Admins: Admins have more power. They can set a “Global Default” parameter set, ensuring all users see this default view upon entry. This helps standardize viewing criteria. Of course, users can still override the global default with their own saved collections.
Quick Reminder: Currently, this collection feature doesn’t support saving dynamic date ranges like “Last Month” or “This Week.” It only saves fixed settings.
Managing Your Knowledge Base
Having mastered form presentation and operation, let’s look at another vital part: the Knowledge Base. You can store FAQs, product descriptions, user manuals, and other information here.
Creating Your First Knowledge Base
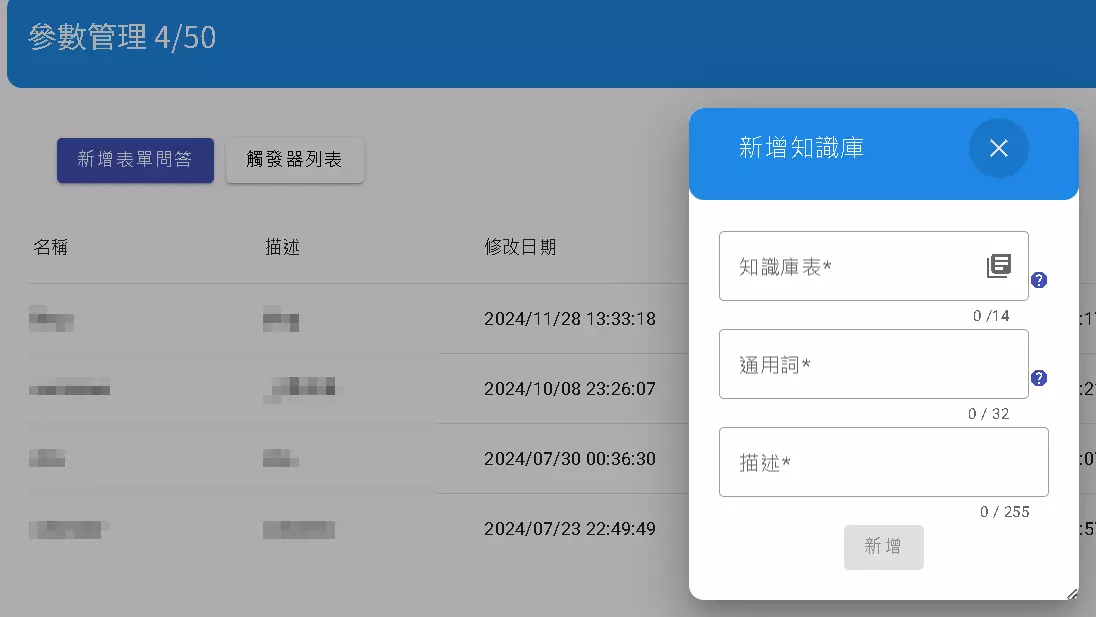
Adding a Knowledge Base is simple, just fill in a few fields:
- Knowledge Base Table: Give this KB an internal code name, preferably in lowercase English. This is for the system and must be unique. E.g.,
faq,manuals. (Required) - Common Terms: Enter some keywords related to the KB content for easier searching later. For instance, if it’s a product FAQ, you could enter product names or feature keywords. Newbie tip: If unsure, just enter the same thing as the “Knowledge Base Table” here; you can change it later. (Required)
- Description: Briefly explain what this KB is for and what kind of content it holds. (Required)
Fill these in, click “Add,” and your Knowledge Base is born!
Adding Fields to Your Knowledge Base
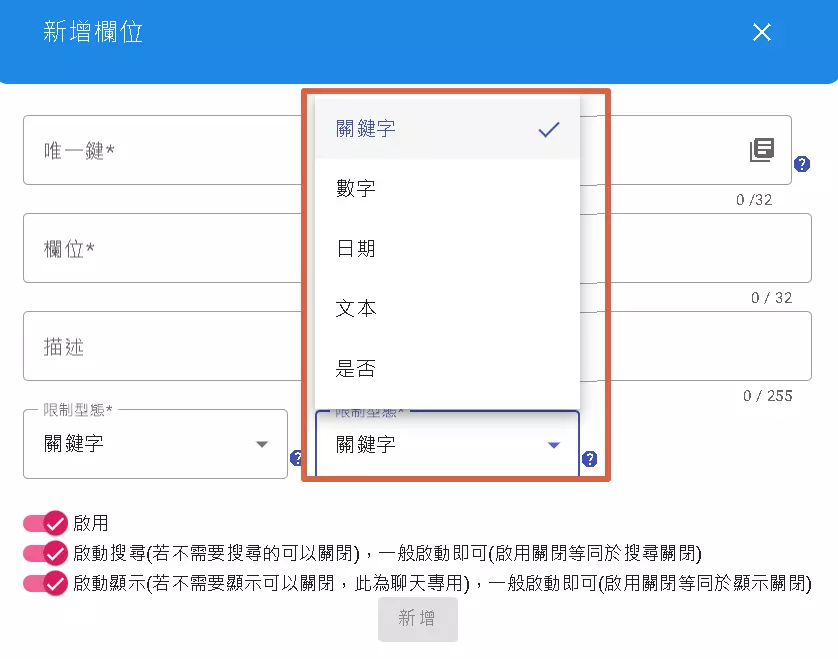
A Knowledge Base also needs fields to store structured information. Adding fields is very similar to setting up form fields in the previous guide:
- Unique Key: The field’s internal code name, lowercase English or numbers, must be unique. (Required)
- Field: The field’s display name, visible to users, can be in Chinese (or your language). (Required)
- Description: Explain what this field is for. (Optional, but recommended)
- Data Type: Choose the type of data this field will store:
- Keyword: Short text, suitable for searching.
- Number: Stores numerical values.
- Date: Stores date and time.
- Text: Long text.
- Boolean: Yes/No, True/False.
- (Required)
Below are three crucial checkboxes:
- Enabled: Master switch! If this isn’t checked, the other two are useless even if checked.
- Enable Search: Allows the chatbot to search this field. If checked, users can find corresponding KB entries by inputting content from this field.
- Enable Display: Allows the chatbot to display the content of this field. If checked, the bot will show information from this field when responding to the user.
Set these up, click “Add,” and the field is added.
“Chatting” with Your Knowledge Base: Managing Content
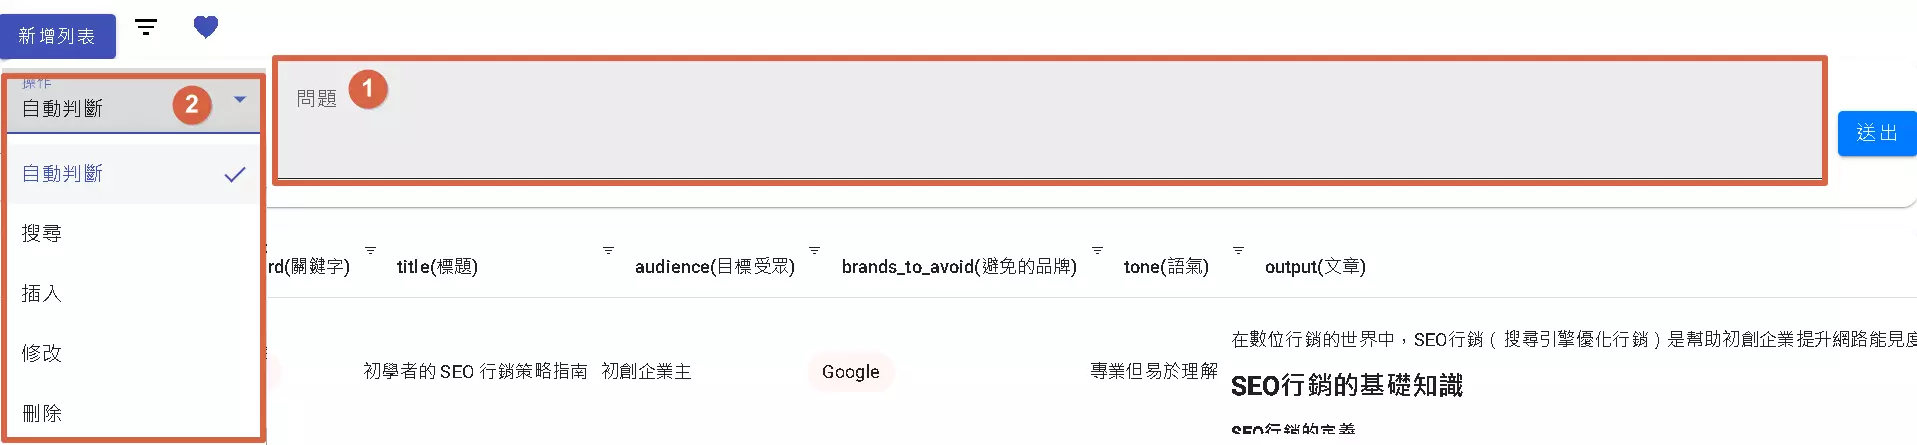
Managing KB content is unique – you can interact with it directly using text!
- Who Can Enter? First, note that unlike the Dashboard which might be accessible to many (if permissions allow), only admins and domain managers can access the KB management interface.
- CRUD Operations: You can perform Create, Read, Update, Delete operations by typing commands.
- Clear Commands Recommended: It’s best to be explicit, e.g., “Add an article about XXX,” “Query all data about YYY,” “Modify the description of ZZZ,” “Delete the old version of AAA.”
- Menu Assistance: The interface usually also provides buttons or menus to assist with these operations.
SUPER IMPORTANT WARNING!
- The interface for chatting with the Knowledge Base and the interface for testing your bot flows use the same user ID behind the scenes.
- NEVER operate in both interfaces simultaneously! Otherwise, the system might get confused about where you’re issuing commands, leading to “state confusion” or session conflict issues!
Who Can Touch My Knowledge Base? Permission Settings
Naturally, KB content shouldn’t be modified randomly. DMflow provides basic permission controls:
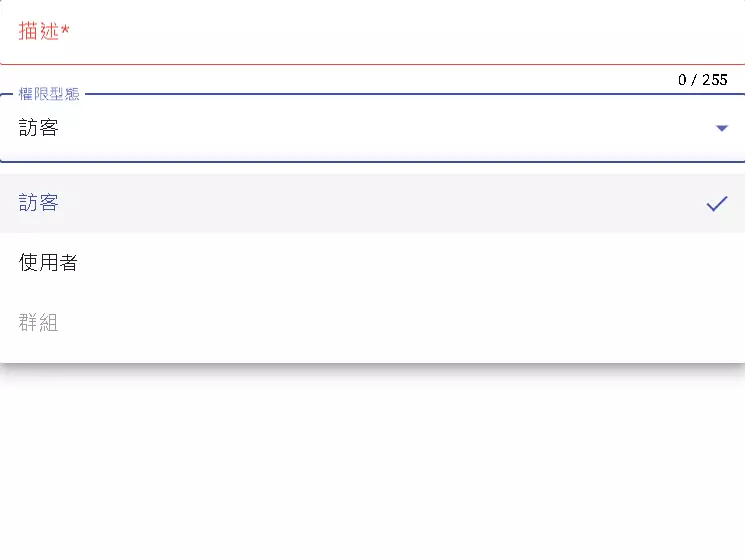
- Roles: Currently, there are two roles: Guest and User.
- Permission Inheritance: “User” automatically inherits all “Guest” permissions, plus some additional ones.
- Permission Types:
- Create: Can add new content?
- Modify: Can modify content? (Usually only their own created content)
- Delete: Can delete content? (Usually only their own created content)
- Query: Can query content? (Usually only their own created content)
- All: This is a powerful permission! Can modify, delete, and query all content, regardless of who created it. Typically reserved for admin-level roles.
These permission settings provide initial protection for your Knowledge Base content.
The Automation Magician: Trigger
Next, we dive into one of DMflow’s core features – the Trigger! Think of it as a pre-set automated instruction: when something specific happens, it automatically jumps in to perform the tasks you’ve assigned.
When Does It Trigger?
Usually when a user performs actions like:
- Create: E.g., submitting a form, adding a new data record.
- Delete: E.g., deleting a record.
- Update: E.g., editing existing data.
- Click: E.g., clicking a button.
What Can Triggers Do?
A lot! Such as:
- Validate data formats.
- Sync data to other systems.
- Send emails or notifications automatically.
- Record operation logs.
- Execute various custom business logic you define.
Want to dive deeper into the power of Triggers? Check out DMflow’s official Trigger documentation.
Triggers Are More Than That: Advanced Features Overview
Triggers aren’t just simple “if this, then that.” They offer more sophisticated capabilities:
- Trigger Flow:
- Design Like a Flowchart: You can design triggers as step-by-step processes, even with branches and loops, much like drawing a flowchart – very visual.
- Add an AI Brain: You can include AI nodes within the flow, making your triggers smarter, capable of natural language understanding, intent recognition, and other cool features!
- Background Flow:
- Working Silently Behind the Scenes: After the main trigger flow completes, you can have the system automatically continue with a “Background Flow.” This is suitable for tasks that take longer and don’t require immediate user feedback (like updating a database or calling an external API).
- No Waiting for Users: This improves the user experience as they don’t have to wait idly.
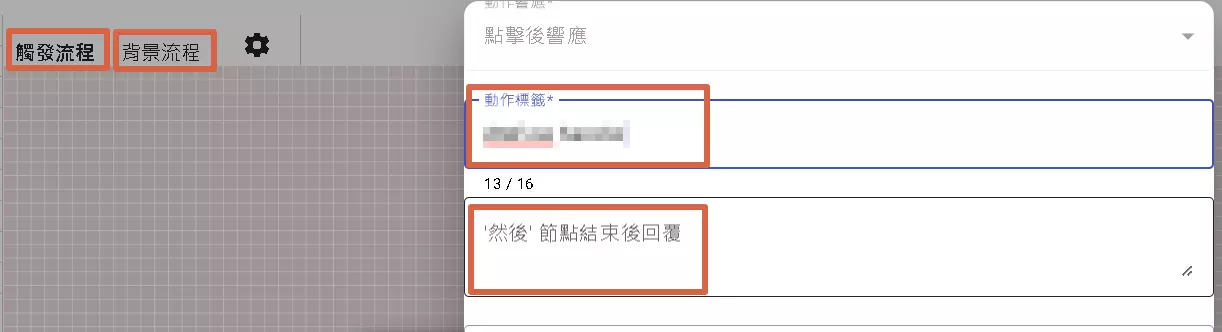
- Action Tag:
- Hints on Buttons: When a user queries, modifies, or deletes data, the trigger can capture the content “before” and “after” the change. You can then display this information on buttons (e.g., a “Confirm Modify” button showing what changed). This makes it clearer to the user what they are doing.
- End Message:
- Feedback to the User: After the entire trigger process (including potentially long background flows) finishes, you can configure a message to be automatically sent to the user.
- Soothing Waiting Anxiety: If the process takes a long time, you can use this message to inform the user “Processing, please wait,” preventing them from thinking the system crashed.
Managing Your Triggers: Trigger List

Once you have many triggers set up, you need a place to manage them. The Trigger List serves this purpose.
You can see for each trigger:
- Which form it belongs to.
- Which action triggers it (e.g.,
click). - The trigger’s name (Action Tag).
- Whether it’s enabled.
- If the last save failed.
- Last modified time.
For each trigger, you can perform these actions (see markers in the image):
- Enable/Disable Switch: Note! This switch only affects whether the corresponding button for this trigger appears in the chatbot interface. If triggered via the Dashboard or API, it can still be activated even if disabled here!
- Details: Click to modify the trigger’s detailed settings.
- Test: Enter test mode to run the flow and check if it’s correct. Note: Test mode can only “Stop” to view intermediate results; you cannot “Pause” and then resume.
- Delete: Remove the trigger.
- Log: View records of this trigger’s actual executions (tests excluded), including when it was triggered, how long it ran, etc.
- Duplicate: Create an exact copy of the trigger, useful for modification or sharing. Note: When duplicating, HTTP nodes (for calling external APIs) within the trigger will not be copied; you need to reconfigure them manually.
Connecting to the Outside World: Trigger Webhook
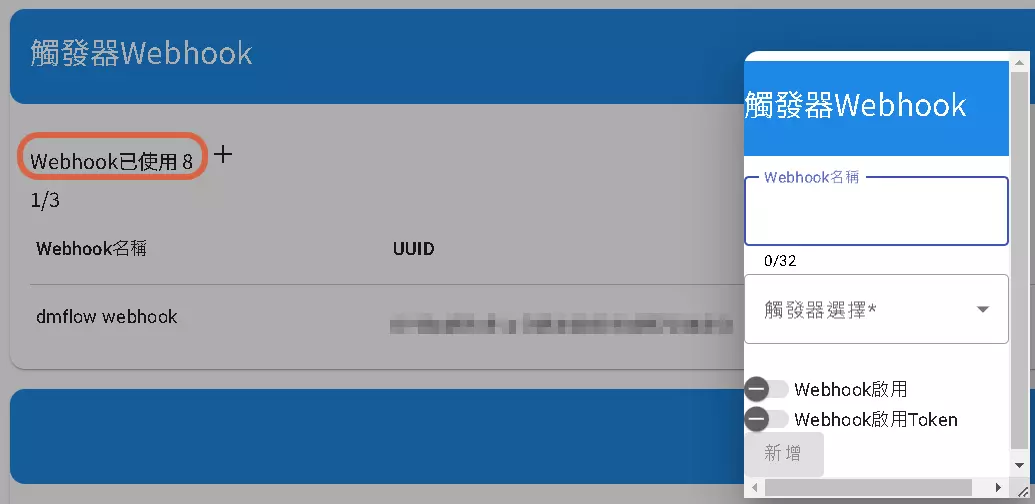
Want external systems (like your website backend or another app) to be able to activate triggers within DMflow? Webhook is your bridge!
- Usage Limit: Be aware! The usage count for all Webhooks is shared, and there’s a monthly limit (currently 10,000 calls). The number circled in red in the image shows the current usage.
- Setting Up a Webhook:
- Name: Choose a memorable name.
- Select Trigger: You can only select standalone triggers that are “not bound to a form.” Webhooks trigger a “flow,” not directly operate on a “form.”
- Enable Webhook: Toggle this Webhook on/off.
- Enable Token Authentication: Recommended! When enabled, the external system calling this Webhook must include the correct
Bearer Token(the `` you set) in theAuthorizationHTTP Header for the system to process the request. Enhances security!
Simply put: After setting up a Webhook, you get a unique URL. External systems can send an HTTP request (usually POST) to this URL, and DMflow will automatically execute the trigger you specified.
But! This Webhook feature is an add-on service and is currently not included in the lite version!
Automatic Execution on Schedule: Trigger Schedule
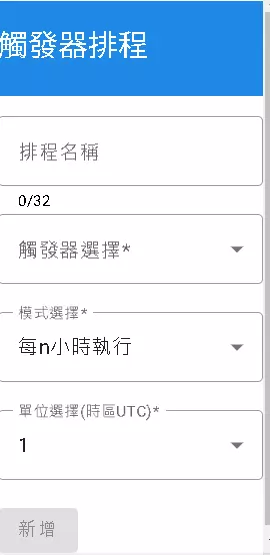
Some tasks you want the system to perform automatically every day, week, or hour, without human intervention. That’s where “Trigger Schedule” comes in!
Setting up a schedule requires:
- Schedule Name: Choose a memorable name.
- Select Trigger: Same as Webhooks, you can only select standalone triggers “not bound to a form.”
- Mode Selection:
- Every n Hours: Runs every few hours.
- Daily at n o’clock: Runs at a fixed time each day.
- Weekly on n: Runs on a specific day of the week at a specific time.
- Monthly on n: Runs on a specific day of the month at a specific time. (If the month doesn’t have day ‘n’, e.g., setting 31st for February, the system smartly runs it on the last day of that month).
- Time Unit (Timezone UTC): SUPER IMPORTANT! The time you set here (e.g., daily 8:00) is based on UTC standard time. Don’t worry though, the system usually automatically converts it to your browser’s local timezone during actual execution or display. But be aware when setting it that you’re inputting UTC time.
Set it up, click “Add,” and your automated assistant is online!
A Slight Difference: About the “Form Domain”
One final point: the “Form Domain” in DMflow (which covers the features we’ve discussed in these articles) behaves slightly differently from other parts (like pure chatbot settings):
- No Detailed Logs: Generally, the system does not keep detailed log records of operations performed within the Form Domain.
- Only SESSION_ID Visible: The only identifier you might see is the SESSION_ID (a temporary ID used to track a user’s current session).
- Original Design Intent: Forms were initially designed for users to “fill out for themselves,” primarily for data collection, unlike chatbots which require continuous learning and model improvement based on interactions.
Why this design?
- Privacy Concerns: Forms can contain sensitive personal information, so not logging is relatively more secure.
- Not for Training: These operation records aren’t very helpful for training AI models.
- System Simplification: Less logging burden makes the system lighter.
So, while the lack of detailed logs might seem like a limitation, it’s also a measure for privacy protection and aligns with the original design goals!
Halftime Break, To Be Continued…
Phew! We’ve explored many advanced features and the powerful triggers of the DMflow form and Q&A system together. From various ways to organize data, managing the knowledge base, to setting up automation flows, doesn’t it feel like DMflow can do more and more?
But the story isn’t over yet! There’s still more to cover about trigger flow design, variable usage, and other in-depth topics. We’ll save those for the next installment, “DMflow Form Q&A System Guide - Part 3”!

