How to Use dmflow to Collect Leads
Creation at: 2024-12-22 | Last modified at: 2024-12-31 | 6 min read
How to Use dmflow to Collect Leads
Are you looking for a simple and effective way to gather lead information during online chats? dmflow might be your best choice. This article will detail how to set up and use dmflow to solve your problems in collecting leads.
How to Set Up a Lead Form
dmflow’s advantages lie not only in its powerful features but also in its flexibility and integration:
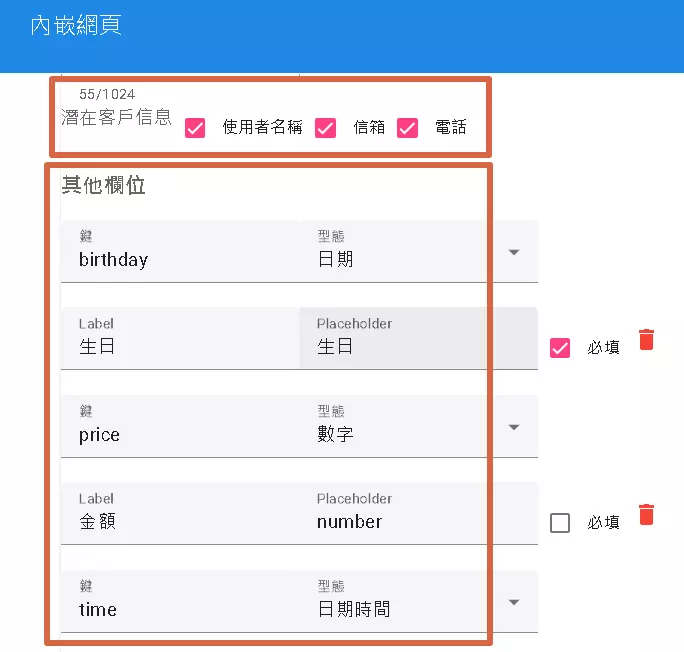
- Custom Fields: Define the customer data fields you want to collect based on your business needs, such as birthday, date, and time, to meet different data collection requirements.
- Data Integration: Can be integrated with other systems like CRM and marketing automation tools, enabling seamless data transfer and application.
- Boost Conversion Rates: Improve lead conversion rates and increase business revenue through more precise customer data and marketing strategies.
- Data Analysis: Analyze the collected data to understand customer behavior and preferences, optimizing marketing strategies and products/services.
Go to Web Chat for Testing
After setting up the form, you have two ways to use it:
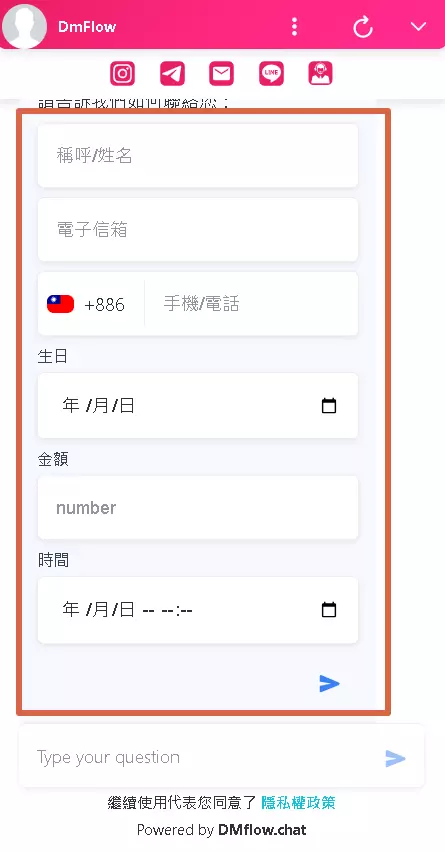
- Embed in Webpage: You can embed the form code into your webpage, allowing visitors to fill out the information directly on your site.
- Share Chatbot Link: You can share a link that guides users to fill out the form through the chatbot interface, providing a more interactive experience.
Test Your Form:
To ensure the form works correctly, it’s recommended to test it. If you have previously entered values, use your browser’s incognito mode to open a new window for testing to avoid data duplication. Please note, do not repeatedly open too many new windows in a short time for testing, as the system may temporarily block your account for 12 hours if it detects repeated visitor creation.
Advanced Use: Using sys_user for Branching
If your process requires users to fill out a form before proceeding, you can use the sys_user variable for branching conditions. This can effectively filter users, ensuring only those who have filled out the form can proceed. For example, you can set a condition:
Field Descriptions:
- System Default Fields: “Email,” “Username,” and “Phone” are system default fields, making it easy to quickly establish basic customer data.
- Custom Fields: Other fields (such as “Birthday,” “Amount,” “Time”) can be customized according to your needs. These fields will correspond to the database fields based on the keys you set. This allows you to collect more precise and business-specific customer information. For example, if you set the key for the “Birthday” field as
birthday, the birthday information entered by the user will be stored in the database field namedbirthday.
Information Collected by dmflow Can Be Used For:
- Creating Customer Profiles: Integrate all information to create complete customer profiles, better understanding your leads.
- Targeted Marketing: Conduct segmented marketing based on customer information to improve marketing effectiveness.
- Customer Relationship Management (CRM): Import data into CRM systems for more effective customer relationship management.
- Data Analysis: Analyze customer data to understand behavior and preferences, optimizing products and services.
How to Set Up a Webhook for Outbound Calls
If you need to set up a lead webhook, go to the publish page to configure it.

Set the events to bot:lead with the following webhook format:
{
  "events": [
    {
      "resource": "bot:lead",
      "action": "add",
      "payload": {
        "email": "",
        "username": "",
        "phone": "",
        "customs": {
          "key": "value"
        },
        "timezone": "+08:00"
      }
    }
  ]
}
Explanation:
resource: Set to"bot:lead", indicating this webhook is for leads generated by the bot.action: Set to"add", indicating this webhook is triggered when new lead data is added.payload: Contains lead information:email: The customer’s email address.username: The customer’s username.phone: The customer’s phone number.customs: Used to store custom field data.keyrepresents the key you set in the form, andvalueis the value entered by the user. For example, if your form has a “Birthday” field with the keybirthday, and the user enters1990-01-01, thencustomswill be{"birthday": "1990-01-01"}.
Example Usage:
Suppose a user fills out the following information in the form:
- Email:
[email protected] - Username:
TestUser - Phone:
0912345678 - Birthday:
1995-03-15(field key isbirthday)
Then the webhook payload will be:
{
  "events": [
    {
      "resource": "bot:lead",
      "action": "add",
      "payload": {
        "email": "[email protected]",
        "username": "TestUser",
        "phone": "0912345678",
        "customs": {
          "birthday": "1995-03-15"
        },
        "timezone": "+08:00"
      }
    }
  ]
}
Key Points:
- By setting up this webhook, you can receive new lead data in real-time.
- The
customsfield allows you to flexibly send any custom field data you set in the form. - The data format sent by the webhook is JSON, making it easy to process in backend systems.
Using the webhook will send the events to the endpoint you specify.
Enable Form Q&A Webhook Reception (Optional)
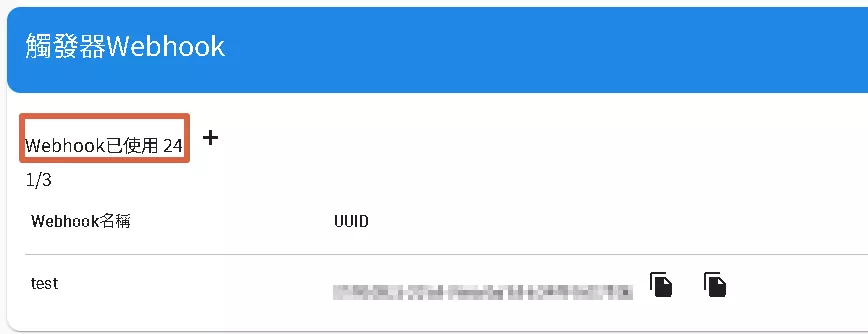
To use dmflow’s built-in trigger (Webhook), go to the form settings page to enable it. Currently, you can only enable one trigger regardless of how many form fields you have, and this feature is not yet available for the lite version users.
Webhook Usage Limits:
- The number in the top left corner shows the number of times the Webhook has been used. All Webhooks share the same usage limit, currently up to 10,000 times per month.
- The Webhook trigger will run in the background and will not affect user interface operations.
Default Webhook Format:
After enabling the Webhook, the default format obtained is as follows:
{
  "start": {
    "events": [
      {
        "resource": "bot:lead",
        "action": "add",
        "payload": {
          "email": "",
          "username": "",
          "phone": "",
          "customs": {
            "key": "value"
          },
          "timezone": "+08:00"
        }
      }
    ]
  }
}
Payload as an Array:
If the payload format obtained is an array, the format is as follows:
{
  "start": {
    "data": []
  }
}
This indicates that the data field is an empty array, and you need to fill in the data in this array according to your actual needs.
Setup and Usage:
After setting up the Webhook, you can start using the trigger. You can enable authority matching to enhance security.
Webhook Trigger Timing:
This Webhook will be triggered in the following situations:
- When new lead data is submitted through the form.
Field Descriptions:
resource: Set to"bot:lead", indicating this Webhook is for leads generated by the bot.action: Set to"add", indicating this Webhook is triggered when new lead data is added.payload: Contains lead information:email: The customer’s email address.username: The customer’s username.phone: The customer’s phone number.customs: Used to store custom field data.keyrepresents the key you set in the form, andvalueis the value entered by the user.
Security Considerations:
It is recommended to enable authority matching. If other products can enable signature verification for the payload, verify the source of the Webhook request to ensure only legitimate requests can trigger subsequent actions, enhancing system security.

